Chest Workout at Home Without Equipment for Beginners
By Zephyr · Published May 18, 2026
Most beginners underestimate how effective bodyweight training can be for chest development. If you’ve been putting off chest training because you don’t have dumbbells or a bench, you’re probably overthinking it.
This chest workout at home without equipment is built for people who want real results without gym access. No complicated progressions, no expensive gear — just a structured routine you can run through in your living room, starting today.
What surprises most people is how quickly an at home chest workout no equipment routine starts to feel challenging. Remove the momentum, slow the rep down, and suddenly a basic push-up becomes a completely different exercise.
Why Bodyweight Chest Training Actually Works
Bodyweight chest training gets hard fast once you stop relying on momentum. That’s the part most people don’t expect.
A lot of beginners quit push-ups early because they feel more shoulder fatigue than chest activation. That’s usually a form problem — not a strength problem. Once you fix hand placement and slow the rep down, the chest starts working the way it’s supposed to.
Most beginners are surprised by how intense slow, controlled movements feel once momentum is removed. The burn you feel holding the bottom of a push-up for two seconds? That’s your chest actually working. At the bottom of the rep, your chest should feel stretched rather than your shoulders collapsing inward. That’s how you know you’re in the right position.
The other thing worth knowing: a solid bodyweight chest workout forces better form from the start. Without a machine guiding the movement, you learn to feel the muscle — which most gym beginners never actually develop.
The American Council on Exercise notes that bodyweight training offers benefits far beyond muscle strength alone — making it a solid foundation for any fitness routine.
6 Chest Workout No Equipment Exercises for Beginners
These exercises are ordered from most accessible to more challenging. Focus on control over speed — a slow, deliberate rep beats ten sloppy ones every time.
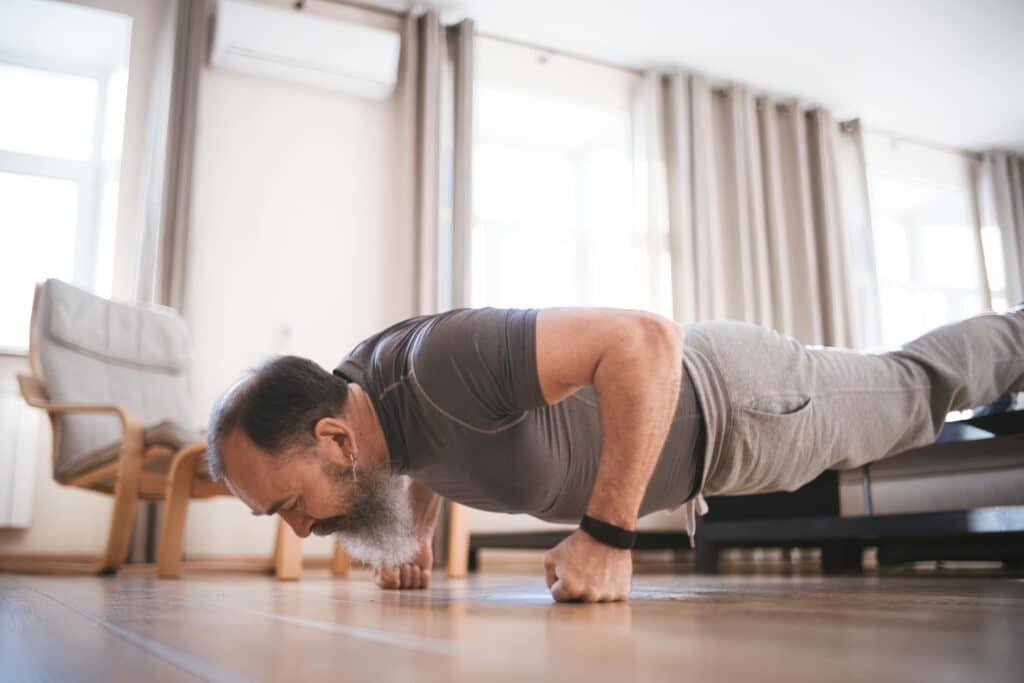
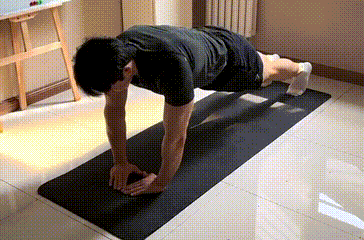
1. Standard Push-Up
How to do it:
- Start in a high plank position with hands placed slightly wider than shoulder-width, directly under your shoulders
- Engage your core to keep your body in a rigid, straight line
- Bend your elbows to lower your chest slowly toward the floor, stopping just above the surface
- Press firmly through your palms to extend your arms and return to the top, squeezing your chest muscles
Sets & Reps: 3 sets of 12–15 reps
Focus: Works the entire chest, shoulders, and triceps, building foundational strength.
Tip: If you don’t have enough strength to complete one full standard push-up, start with the knee push-up instead — kneel on the floor, shins lifted or crossed behind you, maintain a straight line from head to knees.
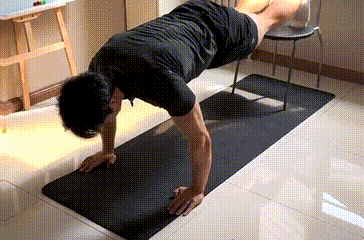
2. Incline Push-Up
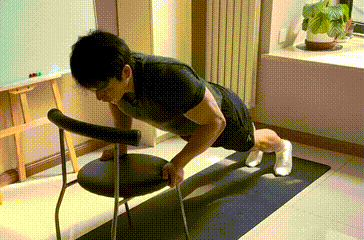
How to do it:
- Place both hands on a stable elevated surface (like a chair or sturdy table)
- Step back into a high plank position, keeping your body in a straight line from head to heels
- Lower your chest slowly toward the surface, keeping your elbows at a 45-degree angle to your body
- Push through your palms to return to the starting position
Sets & Reps: 3 sets of 12–15 reps
Focus: Primarily targets the upper chest for a fuller, more rounded look.
3. Wide Grip Push-Up
How to do it:
- Place your hands significantly wider than shoulder-width apart
- Keep your body in a straight line, avoiding any sagging or arching in your lower back
- As you lower down, flare your elbows out to the sides to emphasize the outer chest
- Push up forcefully to return to the start
Sets & Reps: 3 sets of 12–15 reps
Focus: Targets the outer chest, helping to build width and definition.
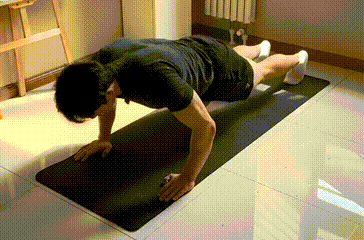
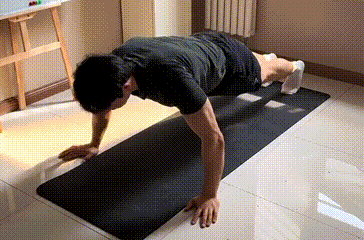
4. Diamond Push-Up
How to do it:
- Place your hands close together on the floor, forming a diamond or triangle shape with your thumbs and index fingers
- Keep your elbows tucked tight to your sides as you lower your chest toward your hands
- Control the movement all the way down, then press back up powerfully
Sets & Reps: 3 sets of 12–15 reps
Focus: Emphasizes the inner chest and triceps, helping to fill in the center of the chest.
5. Decline Push-Up
How to do it:
- Place both feet on a stable elevated surface (like a chair or step)
- Assume a high plank position, keeping your body in a straight line from head to elevated feet
- Lower your chest slowly toward the floor, maintaining control
- Press through your palms to push back up to the starting position
Sets & Reps: 3 sets of 12–15 reps
Focus: Challenges the upper chest and shoulders, increasing overall chest muscle activation.
6. Post-Workout Wall Chest Stretch
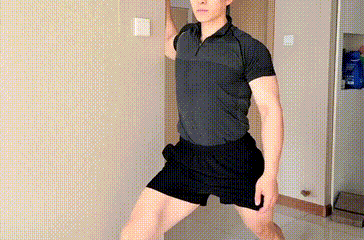
How to do it:
- Stand next to a sturdy wall, bend your elbow to a 90-degree angle and keep it at shoulder height
- Slowly rotate your body away from the wall until you feel a gentle, deep stretch in the front of your chest
- Hold for 30 seconds, breathing steadily — do not hold your breath
- Switch sides and repeat for your left chest
Sets: 2 sets of 30 seconds per side
This stretch is designed to be done immediately after your chest workout to reduce muscle tightness, improve flexibility, and ease post-workout soreness.
Ready for more? Check out our Beginner Calisthenics Back Workout at Home guide.
Quick Beginner Chest Routine
Here’s how to put it together into one session:
Warm-Up: Arm circles and shoulder rolls — 30 seconds
Main Workout:
- Standard Push-Up — 3 × 12–15
- Incline Push-Up — 3 × 12–15
- Wide Grip Push-Up — 3 × 12–15
- Diamond Push-Up — 3 × 12–15
- Decline Push-Up — 3 × 12–15
Cooldown: Wall Chest Stretch — 30 seconds each side
Rest 45–60 seconds between sets. Run this 3 times per week with at least one rest day between sessions.
What Most Beginners Get Wrong About Chest Training
Even the best chest exercises for beginners won’t deliver results if these habits keep showing up.
Rushing through reps: Most beginners speed through each rep to hit a number. When you rely on momentum instead of muscle effort, your chest barely works — and you wonder why nothing changes. Slowing down feels harder because it removes the momentum. That’s exactly the point.
Wrong hand placement: New lifters default to whatever feels stable. Too narrow shifts the load to triceps. Too wide stresses the shoulders. Neither builds the chest effectively. If your wrists hurt more than your chest, your hand positioning probably needs adjustment. Slightly wider than shoulder-width is the starting point — adjust from there based on what you actually feel working.
Skipping the squeeze at the top: Most people finish a rep and immediately drop back down. Your pec muscles should feel tight at the top of the movement, almost like you’re trying to squeeze something between them. Pausing there to deliberately hold that tension adds muscle activation most beginners never experience. It feels awkward at first — which usually means it’s working.
Training too often without recovery: Beginners often train the same muscles daily thinking more is better. Chest muscles grow during rest, not during training. Three sessions per week with rest days in between is enough to see consistent progress.
No equipment chest workout feeling too easy: If your no equipment chest workout feels too easy, the problem is almost never the exercises. It’s the tempo. Slow every rep down to a 3-second lower, pause, press. The same routine becomes significantly harder without changing anything else.
Progression Tips
No gym needed to keep making progress long-term. Once the routine starts feeling manageable, here’s how to make it harder without adding equipment:
- Slow the lowering phase to 3–4 seconds on every rep
- Add a 2-second pause at the bottom of each push-up variation
- Increase reps gradually before adding extra sets
- Adjust elevation on incline and decline moves to keep hitting your upper chest and lower chest from new angles
- Once the routine feels controlled and strong, move toward more advanced push-up progressions
The goal isn’t to do more — it’s to make each rep harder. That’s where real chest strength comes from.
This bodyweight chest workout is designed to build a foundation first. Once these movements feel controlled and strong, you’ll be ready for more advanced progressions.
Looking for more no-equipment workouts? Browse our complete No Equipment training section.
Conclusion
Building a stronger chest doesn’t require a gym or equipment. A well-structured chest workout at home without equipment gives beginners everything they need to develop real chest strength, better posture, and more upper body control.
Fix the form, slow the reps down, stay consistent three times a week, and the results will come faster than most people expect. Start your first session today — your living room is enough.
Ready for the next level? Check out our Advanced Calisthenics Chest Exercises guide.